Clay Vases Designs
 The Singing Bone: sculpture notes
While I was working on illustrations for Grimms Märchen and The Singing Bones, I remembered to document a little of my process, so here it is. I don't think there's anything special about it and I imagine there are many other ways to create effective sculptural illustrations (some no doubt better than mine). In any case, below is a step-by-step example of how I approached this task, fairly consistently over 75 works. The Grimm story I am illustrating here is 'The Singing Bone', from which I drew my own collection title, about one brother murdering another in order to claim a reward for killing a wild boar.
Interestingly, I did not make the kind of preliminary drawings for this project that I normally would, and often started making the first thing that came to mind upon reading each story (also unusual for me). I guess I was very interested in capturing an immediate gut-reaction, and just getting my hands dirty without over-thinking things too much.
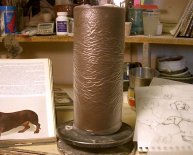
Here's my basic structure for one figure, made of papier mache and wire. I usually start by bending a strong wire into a rough shape, then squeezing pulp around it. I make the pulp by ripping a newspaper into strips, soaking it in a bucket of water until broken down, then straining it. I then mix it with a tapioca- or potato-flour glue (a little flour in a saucepan of water, gradually heated until viscous and clear). My dad used this technique a lot as a child in Malaysia and the resulting form, once dried in the sun, is extremely hard, durable and very light (I used to make a lot of masks with him as a kid). It can also be cut with a knife. The 'lumpiness' of these shapes are quite suggestive and this process typically introduces a lot of accidental forms, often a good thing.
Here I'm starting to add air-drying clay over the form, working quite quickly, not thinking too much about the result. I find it's important not to get bogged down in detail, and 'let nature take its course' to some extent. There are different kinds of air drying clay: I've used DAS, which is (I think) a kind of finely pulped paper, so also quite light when dry. It's not as subtle as real clay, but I've gotten used to its character and find it quite versatile (the terracotta-coloured kind seems easier to work with than the white one, having less elasticity). Why not just use real clay? I wanted to introduce objects and other materials into my figures, of a sort than kiln firing would not allow. I also like the immediacy of working with air-drying clay, and how easily you can later add to it, wet on dry if need be.
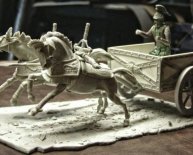
A little more modeling, but still pretty rough. As a shape takes form, I'm thinking of how the emotion or attitude of a character can be conveyed through very simple body language, especially as my figures don't usually have expressive faces (or any faces at all sometimes). Here, I was aiming for a sense of a man about to strike his brother with a club as they are walking home. In the story the violence is disturbingly casual, even psychopathic in its lack of empathy, so I wanted something cold in the attitude of my figure.
A little more refinement of surface, adding some unity of weight and curve to the back and limbs.
Once the form is dry, I carve into it with knives, files and sandpaper. The final style of the figure is largely defined by this carving. It's also easier to simplify and smooth surfaces this way, and again it discourages me from adding too much detail. I very much wanted these figures to have a bluntness about then, without too many distracting embellishments.
A few layers of acrylic paint later and the figure has a stony appearance. I often change my mind about colour, painting a sculpture multiple times, but that only adds to the complexity of the surface, as if the object has had some life of its own, some history. Rubbing back with a damp cloth before acrylic paint has cured, or with turps in the case of oils, produces a very nice, natural-looking surface.
With the hapless victim added, I tried out different compositions in front of the camera. Something seemed missing until I added rocks from a local gardening-supply store, lending a theatrical and elemental feeling to the scene. The hard overhead lighting with a cool lamp created the right atmosphere, a certain claustrophobia and starkness: a timeless pause before the critical moment of action. The narrow focus with fore-and background blur also isolates the figures and sustains their small scale: the act is tiny but terrible, happening far away from the the light of a larger world. The final image was edited slightly in Photoshop, mainly darkening the sky. I try to keep digital editing as minimal as possible, and get as much as possible right in the initial photography, just because 'real' solutions usually look much better than digital ones.


Share this article
Related Posts

Latest Posts


